Can you flash your phone yourself?
The only way to flash your phone is by unlocking the bootloader. The bootloader, akin to your computer’s BIOS, comes locked on all Android devices by default, preventing users from flashing. To unlock the bootloader, follow these steps:
Enable Developer Options: Go to Settings > About phone, then tap on the “Build number” 7 times until you see a message indicating that Developer Options have been enabled.
Enable OEM Unlocking: In Developer Options, enable the “OEM unlocking” option.
Enable USB Debugging: Also in Developer Options, enable “USB debugging.”
Connect to Computer: Connect your phone to your computer via USB.
Boot into Fastboot/Bootloader Mode: Power off your phone, then boot into fastboot or bootloader mode. This is usually done by pressing a combination of hardware buttons while powering on the device. The combination varies depending on the device manufacturer, so consult your device’s manual or search online for instructions specific to your model.
Open Command Prompt/Terminal: On your computer, open a command prompt (Windows) or terminal (Mac/Linux).
Unlock the Bootloader: In the command prompt or terminal, type the command specific to your device manufacturer. For example, for many Google Pixel devices, the command is “fastboot flashing unlock.” Press Enter to execute the command.
Follow On-Screen Instructions: Your phone will display a confirmation message. Follow the on-screen instructions to confirm the bootloader unlock. Note that this will erase all data on your device.
Reboot: Once the bootloader is unlocked, reboot your device.
Please note that unlocking the bootloader voids your warranty and may cause data loss. Ensure you have backed up all important data before proceeding. Additionally, the process may vary slightly depending on your device model and manufacturer, so it’s essential to follow instructions specific to your device.
What are the disadvantages of flashing a phone?
Another potential side effect of flashing is the loss of certain features on the phone. For instance, after being flashed, some phones may no longer be able to send or receive picture messages. If this is a concern, it’s advisable to consult with a U Wireless professional before proceeding with the flashing process to ensure you are aware of all the potential details and consequences.
What happens if I flash my phone?
Things You Should Know: Flashing a phone typically involves reprogramming it to work with a new carrier. However, when attempting to flash a phone at home, there are inherent risks to consider, such as voiding the warranty or even experiencing a complete device shutdown. For a safer and more reliable option, authorized cell phone dealers can provide professional assistance with flashing your phone.
How long does it take to flash a phone?
Two minutes does seem a bit quick. Typically, the flashing process takes around 5 to 8 minutes, while flexing may take about 8 to 10 minutes. However, if you power cycle the phone and everything functions correctly, it suggests a successful flashing process.
How do I wipe or flash my phone?
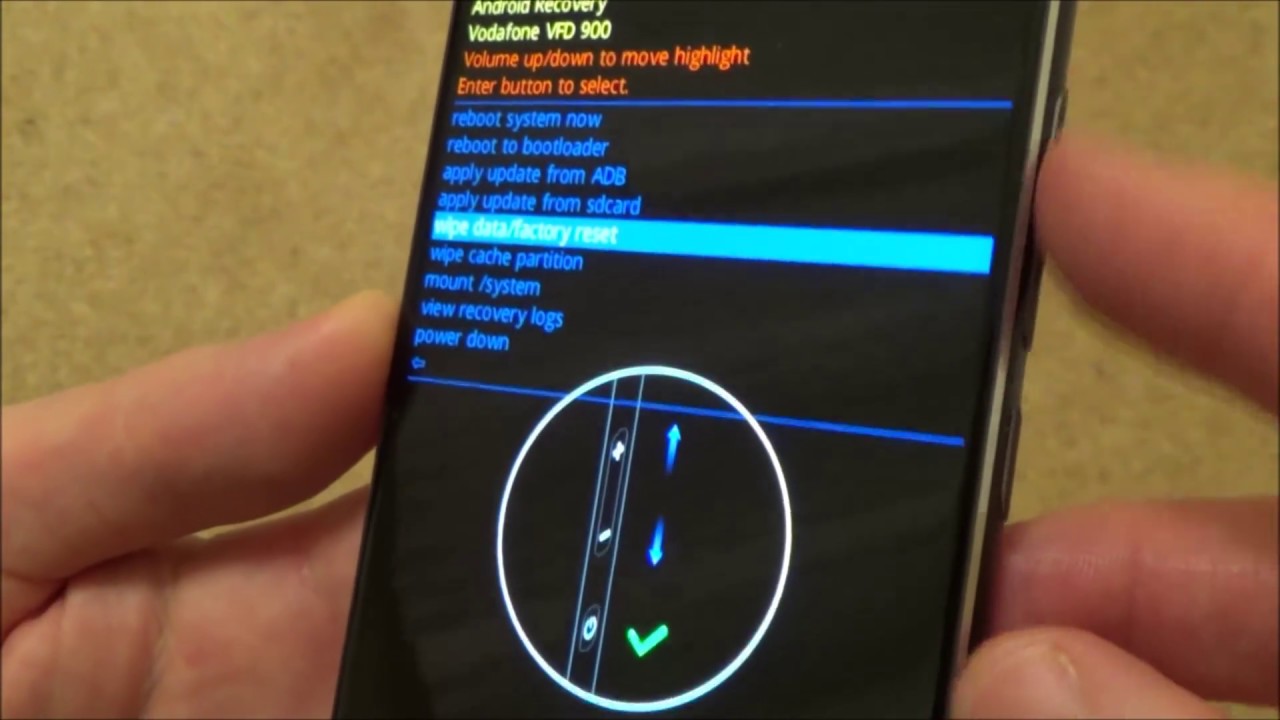
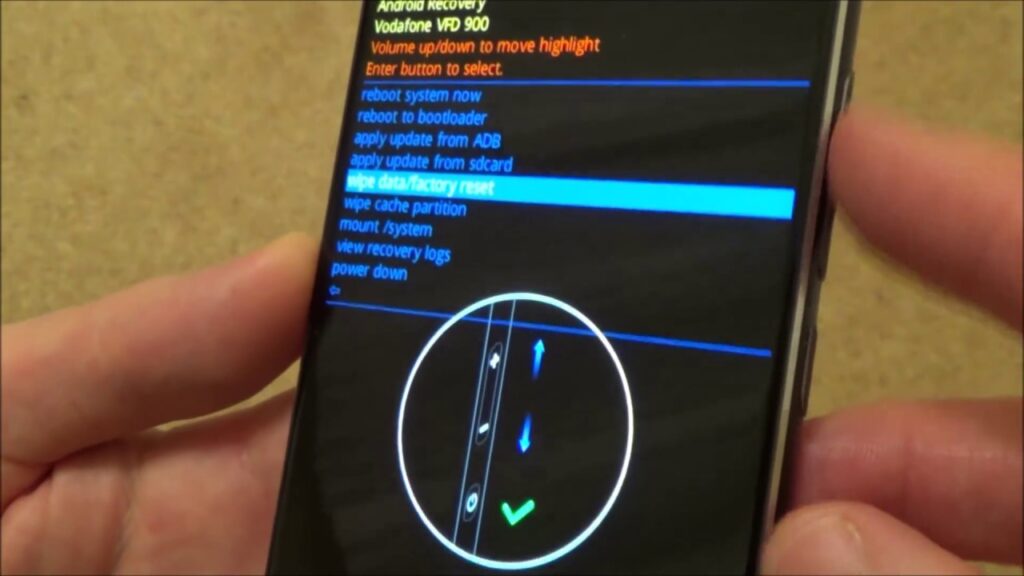
To initiate recovery mode on your device, follow these steps:
Press and hold the power button along with the volume down button simultaneously until a loading screen appears.
Once the loading screen appears, utilize the volume buttons to navigate down the list of options.
Select “Recovery mode” from the list using the volume buttons.
Press the power button to confirm your selection.
After the phone restarts into recovery mode, again utilize the volume buttons to navigate through the menu.
Select “Wipe data/factory reset” from the menu using the volume buttons.
Press the power button to confirm and initiate the factory reset process.
Please note that the exact steps may vary slightly depending on the make and model of your device.
How do I completely format my phone?
Perform Data Backup: Before initiating the factory reset process, it’s crucial to back up all your important data to preserve it. You can use various methods such as backing up to the cloud, using a computer, or utilizing built-in backup features on your device.
Enter Recovery Mode: Hold down the Volume Up + Home + Power keys simultaneously until the device enters recovery mode. The key combination may vary depending on the device model, so ensure you’re pressing the correct keys for your device.
Navigate to Wipe Data/Factory Reset: Once you’re in the Android recovery mode, use the volume keys to navigate through the menu options. Scroll down to the option labeled “wipe data/factory reset.” This option is typically located towards the bottom of the menu.
Select Wipe Data/Factory Reset: Use the volume keys to highlight the “wipe data/factory reset” option. Once highlighted, press the Power key to select it and proceed with the factory reset.
Confirm the Action: After selecting “wipe data/factory reset,” the device will prompt you to confirm the action. Confirm that you want to proceed with the factory reset. Keep in mind that this action will erase all data on the device.
Initiate Factory Reset: Press the Power key again to confirm and initiate the factory reset process. The device will begin erasing all data and restoring it to its factory default settings.
Wait for Completion: Wait for the factory reset process to complete. This may take a few minutes, depending on your device.
Reboot: Once the factory reset is complete, the device will automatically reboot. It will boot up as if it were brand new, and you’ll need to go through the initial setup process, including selecting language, connecting to Wi-Fi, and signing in to your Google account.
Please note that performing a factory reset will erase all data on the device, including apps, settings, and personal files. Make sure you have backed up all important data before proceeding. Additionally, the exact steps and options in the recovery mode menu may vary slightly depending on the device model and manufacturer.